Everyone likes colourful LEDs, don’t they? And what if I tell you that we can get all the 3 primary colours (red, green, and blue) in a single LED? Exciting, isn’t it? Here’s where RGB LED comes into the picture. Let’s see how to interface an RGB led with Arduino.
RGB, as we all know, stands for :
- Red
- Green
- Blue
They are one of the primary colours which can be mixed in different proportions to result in various colours.
1. Problem Statement
- We need to create a message for our loved ones, but NOT as a direct text message. When I say loved one, it can be your mother, father, sister, or just anyone whom you love and want to express your feelings to!
- This has to be done with the RGB LED, Arduino, etc. Frame your own way of conveying your message to the person with the help of the components discussed
*Hint for the Solution: For this project, we will be showing ‘143’ with the help of an RGB LED
2. How does an RGB LED work?

- As we know, red, Green and Blue are one of the primary colours that can be used to obtain different colours.
- This is done using different compositions or ratios of the 3 colours during mixing.
- And how does mixing happen? The answer is that – It just happens under one LED –> This makes the colours get mixed
The best analogy is the painting palette, which we normally use in our drawing classes. Consider having the smaller version of the paints. So, how did you use to obtain different colours? –> By mixing those available colours in different ratios!


- The given below are some of the shades which you can make with the help of RGB combinations :
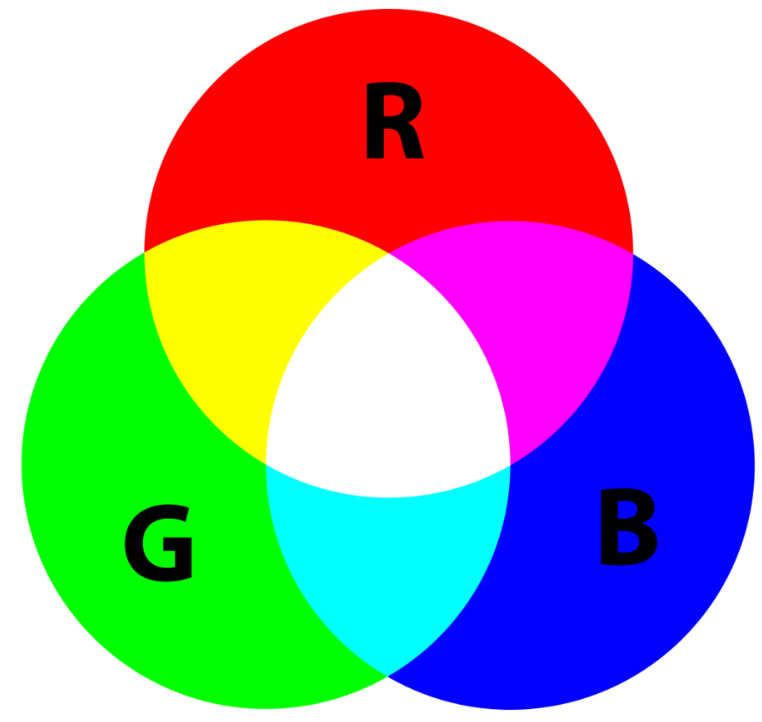
Also, different shades of the colours can be obtained by varying the intensity of the RGB colours
3. Components Required
- Arduino Uno
- RGB LED x1
- Resistors (220 ohms) x3
- Jumper Wires

4. Pinouts and Circuit Diagram
The RGB LED has 4 pins –
- RED
- BLUE
- GREEN
- GND

Always check the pin name associated with the pin. The pin order might change from manufacturer to manufacturer!
Important:
Treat each of the colour pins as a separate LED. Only then can you control each colour on the LED individually.
- This implies that you will need a separate resistor to protect each of the 3 LEDs – Therefore, we choose three 220 ohms resistors
Schematic Diagram on TinkerCad:

Pin Connections:

5. Explanation and Code
So, as discussed in our Problem Statement, we are going to code our LED such that it somehow conveys the message ‘143’ (A modern way to say “I love you“). This is how it can be done :

- If you look into the Pinouts Section above, you will notice that the Pins 5, 6, and 9 have a ‘~’ type of symbol adjacent to them on the Arduino Board. This symbol represents that the Pin is a PWM pin.
- PWM stands for Pulse Width Modulation
- It’s a kind of additional Superpower which is given to a digital pin to process the data differently if needed. We will be discussing this in detail in upcoming Articles.
- For now Let’s take a small example and have an idea about PWM in Layman’s terms.
We know that Digital Pins have only 2 signals – ‘1’ and ‘0’ –> i.e. It’s either ON or it’s OFF, respectively. This case is like a switch that we use to turn ON and turn OFF the fan.


Fig. For Digital Pins without PWM
BUT Now, PWM is like adding a Regulator besides the switch (it’s just an addition to what we had before). This will allow us to vary and control the speed of the fan as well.

Fig. For Digital Pins with PWM
Code:
The code for the Main Project can be found in the attached GitHub File. The comments will guide you to understand the reasoning for that particular section of code.
You can directly just copy and paste the code given below:
/*
-----------------------------------------------------------
Website: www.physicsandelectronics.com
Refer Article for in-Depth Explanation about this Project & Explore More

Main Project : RGB LED interfacing with Arduino
Instagram : @physics_and_electronics
Youtube Channel : Physics And Electronics - Saurabh Salvi

**Main Code for the Project**
-----------------------------------------------------------
*/

//Declaring pins for each colour on RGB led (All are PWM pins)
int red = 5;
int green = 6;
int blue = 9;

void setup() {
  // put your setup code here, to run once:
  // All pins are set as OUTPUT
  pinMode(red, OUTPUT);
  pinMode(green, OUTPUT);
  pinMode(blue, OUTPUT);
}

void loop() {
  // put your main code here, to run repeatedly:
//Blink Red Colour once
ledColour(255, 0, 0);  //Keeping only RED colour for 1000ms
delay(1000);
ledColour(0, 0,0);      //Keeping LED off for 800ms (For a pause)
delay(800);

//Blinking the Green Colour 4 times
for(int i=0; i<=3; i++){
  ledColour(0, 255, 0);
  delay(1000);
  ledColour(0, 0,0);
  delay(200);
}
ledColour(0, 0, 0);
delay(800);

//Blinking the Blue Colour 3 times
for(int i=0; i<=2; i++){
  ledColour(0, 0, 255);
  delay(1000);
  ledColour(0, 0,0);
  delay(200);
}

//Keeping White COlour
ledColour(0, 0, 0);
delay(1000);
ledColour(255, 255, 255);
delay(5000);
}

//defining a function for colour selection on RGB Led
void ledColour(int redVal, int greenVal, int blueVal){

  analogWrite(red, redVal);
  analogWrite(green, greenVal);
  analogWrite(blue, blueVal);

}
6. Assignment:
Problem Statement:
You need to design a police siren with flashing alternating red and blue lights. You are free to design your own concept, but please try to stick to these two colors.

Components to be used:
- RGB LED x2
- Arduino Uno
- Breadboard
- Resistors*
- Wires
*Decide the resistance value yourself. If you want a reference, you can read the related article by clicking HERE
Make the Project in TinkerCad or any other Simulation Software which supports Arduino
For Submission/Doubts: You can send me an email at: connect@physicsandelectronics.com
Conclusion:
So, through this Mini Arduino Project-2, we learnt to interface an RGB LED with Arduino and also learnt some basic working of the same. As discussed, we will be looking into PWM signals in a lot more detail in upcoming articles.
- Don’t forget to attempt the Assignment Problem. It will allow you to apply the knowledge you gained in the article (Information + Arduino Code)
Keep Learning!